My last Christmas Card of the season!
Tuesday, December 25, 2012
Rocking Snowman!

BUILDING THE FOUNDATION

SHAPING THE BODY

NEEDS SOMETHING...

NOW THAT'S A ROCKIN' SNOWMAN!
MERRY CHRISTMAS
AND A
HAPPY NEW YEAR!

Friday, December 21, 2012

Cookie Exchange
I was looking back and realized that I haven't posted in awhile so I thought you might be interested in my cookie exchange project.

Mother Lode Pretzel Rods
They are loaded with caramel and three different chips. Then to make them Christmasy, I added some red, green, and white candy sequins and Christmas trees. I was told they were yummy but I wouldn't know as I don't like pretzels. I always try to make something a little out of the ordinary for cookie exchanges. I cringe at the mention of sugar cookies and thumbprints. So blah!


Four dozen pretzel rods later!
I was actually surprised at how quick and easy they were. Wrapping them was the worst part of it all because some of them were bigger. It got challenging to see if I could stuff the rod in a pretzel wrapper without breaking it. I did it with no lose of rods!
UPDATE!
The girls did a good job on their cookies. I received a good variety (Oatmeal, Italian bars, Ricotta cookies) and they are now my centerpiece on my table. Not for long though! My husband is a sugar hound!
Wednesday, December 5, 2012
I'm a Wobble Winner!
Wobble Wednesday Challenge #36 - Sparkle
Hi Everybody!
Jenny from Crazy About Cricut here, and I'd like to welcome you to the next Wobble Wednesday Challenge! Before I announce this weeks challenge, let's see who last week's winner is..................
Congratulations!! Make sure you email
thescrapbookingqueen1@gmail.com
to claim your wobble prize.
Sunday, November 25, 2012
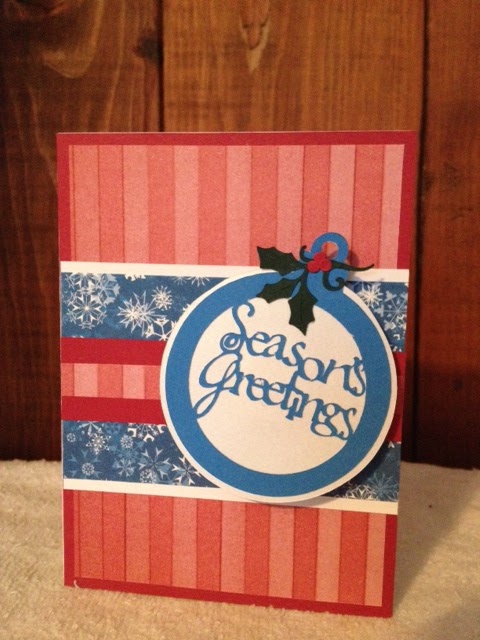
Christmas Challenges Card
This card came out much better than I thought it would. I like that it is not the traditional colors but still has a Christmasy feel. The bulb sentiment is from JOYS of the SEASON cut at 3". An iridescent circle backs the bulb. Holly with berries, also cut from the same cartridge at 1", tops the hanger.

I like to finish the inside as well as the outside. I don't see many blogs posting the inside but I think this is as important and I think a little harder to do than the front. You want to decorate it but you want to leave some room to write also. The inside of my card uses the same backing paper as the front with a larger holly cluster. White paper makes a crisp, clean area to write a personal message or just a signature.
My first try at a video! I think it worked. The sentiment bulb is on an Action Wobble.
I am entering this card in the following challenges:

Wobble Wednesday #35 - Sentiments Wobble
Cricut Cardz #121 - Speaking of Christmas
Paper Playtime #89 - Anything Goes
Wednesday, November 21, 2012
Thanks!
Thank you all for your fabulous comments about my Pilgrim card. You inspire me to be creative!
I WON!
Whoo hoo! My Pilgrim card was chosen for the Fantabulous top 5!
...SO...
DRUM ROLL PLEASE !!

Wednesday Winners !! Challenge #137 Pilgrim's Progress
Happy Wednesday !!
Welcome to this weeks winners post
Challenge #137
Challenge #137
Pilgrim's Progress
Janea challenged us to make a project using a Pilgrim/Indian or something from the First Thanksgiving, a theme very close to her heart !!
Janea challenged us to make a project using a Pilgrim/Indian or something from the First Thanksgiving, a theme very close to her heart !!
I, sadly, copped out and swapped my week with her, but having seen all the fabulous projects I shall be well equipped with inspiration when the challenge comes round again !!
...SO...
DRUM ROLL PLEASE !!
THIS WEEKS WINNER
Chosen by random.org
with a prize from
...IS...
No 23
Maida
 All Things Cricut have very generously donated TWO Cricut Magazines or Idea Books of the winners CHOICE
Congratulations Maida to claim your prize please contact Janea at...
recollection alley @ gmail . com (remove all spaces)
Maida
Congratulations Maida to claim your prize please contact Janea at...
recollection alley @ gmail . com (remove all spaces)
You have two weeks to claim your prize.
Remember to grab your "FCCB Winner" blinky to display on your blog, you can find the blinky
code in the right hand side bar.
Remember to grab your "FCCB Winner" blinky to display on your blog, you can find the blinky
code in the right hand side bar.
DESIGN TEAM TOP 5
We had 24 amazing projects to choose from this week
Thank you to every one who joined us
In ascending order the winners are
No 2
Reesey
 No 7
No 7
Rae Ann O
 No 12
No 12
Bobby
In ascending order the winners are
No 2
Reesey

Rae Ann O
Bobby


Congratulations Ladies don't forget to grab your "FCCB Top 5" blinky to display on your blog!
You can find the blinky code on our right-hand sidebar.
We hope you are joining us for this week's Challenge #138
"Be Ye Thankful"
Just, before I go, I need to give a gentle reminder of some of the FCCB challenge rules because we want your project to count after all the love and effort that you put into creating it.
Please bear in mind the following when you enter your project:
Use at least one Cricut cut on your project
Tell us which Cartridge(s) is used
No Back linking we are challenging our creativity in the moment !!!
AND
Please please please consider turning off the word verification tool it really does stop us sharing our thoughts with each other.
Oh my goodness ...
... I sound like your teacher !! x !! x !! ...
... BUT, it's only so we can all share fair in our playground of inspiration !! x
Wishing everyone a Fantabulous Day !!
Sunday, November 18, 2012
Stampin Up Class Projects
The following cards are projects I did at a Stampin Up class! Their stamps are so detailed and the ink is crisp and matches the paper perfectly.


I love the little lasso and the rhinestones on the shank. They had the toe of the boot colored red, but I liked it plain.

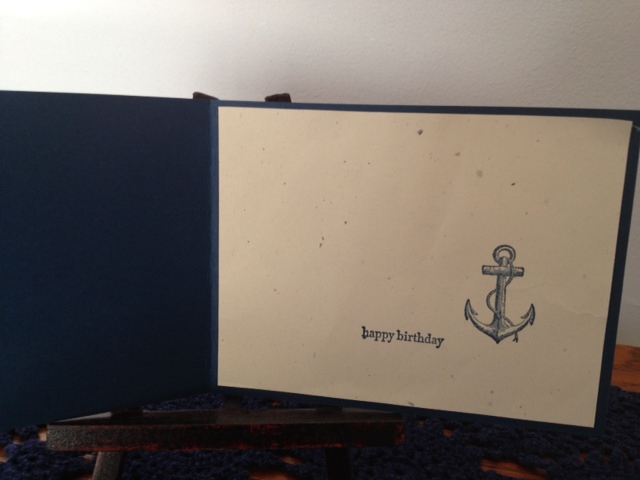
The stamps for this project were incredibly detailed but stamped crisp and clear with no fuss at all. The instructions had Happy Birthday under the ship, but I put mine on the inside with an anchor.


The technique to make the sun was fun! Punch a circle from printer paper and place it on your paper with repositionable tape so it comes off without tearing your cardstock. Ink a sponge dauber and lightly swirl it over the paper circle and the area you want to be sky. Gently pull the circle off the cardstock and you have a perfect sun or moon! The snow hills are made with torn paper and micro glitter.

This technique was a layered butterfly done with their matching stamps and cutting dies.
Stamp one butterfly on your card stock in black. Then stamp two more on a separate piece of white cardstock. Color or chalk as desired and glue the first butterfly on top of the stamped image. For the third buttrfly, cut around the upper wings and body so you have no lower wings. Attach this with foam dots to the second butterfly. It makes a very cute layered look but doesn't stick very high off the card. A fourth butterfly was stamped on the edge and a rhinestone added to thi body. The reason you stamp the butterfly on the bottom is so you have the antennae for the layered butterfly. No way you could cut those tiny things out.
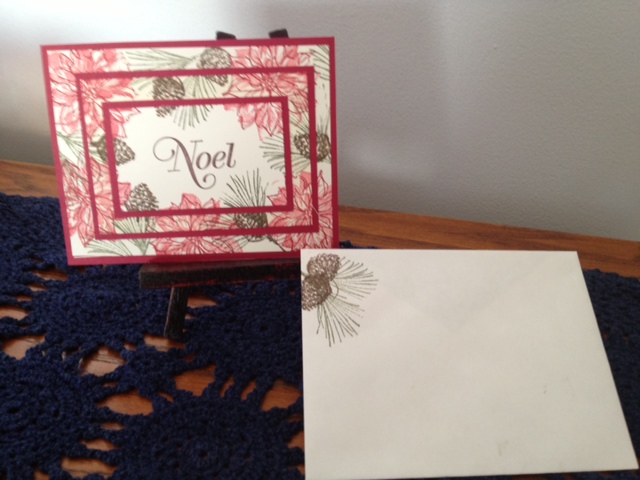
This technique is one you may see alot lately on YOUTUBE. It is sometimes called Triple Stamping and involves 3 layers of card stamped all at once in a layer. Then you separate the 3 pieces and mount on cardstock. Keeping the pattern matching, you glue the layers back together with the mats under each. I love the pointsettia and pine cone stamps. I am going to try this with some other stamps I have. I think it works best with large images.

This is by far my favorite card design we did! So pretty with the sun/moon technique and the micro glitter on the snow. The snow was made with torn paper and sponging similar to the sun/moon. They didn't stamp their envelopes but I thought it made a nice touch.
This class was really fun and I have to thank Debra for the invite and her husband for being nosy in the post office when I was mailing out my Halloween cardswap cards! If this had not have happened, I wouldn't have known about the classes and continued to ignore the quality and fun that Stampin Up offers its customers. As soon as Debra sends me the catalogs, I will be ordering a bunch of stuff (on my hubby, of course). Merry Christmas to me!
Mice Throwing Snowballs


This is my entry for the Freshly Made Sketches Challenge #61.
I used only the bottom part of a stamp I received free from Cardmaking & Papercraft Magazine by coloring the section I wanted with Marvy Brush Markers.
Two little mice throwing pompom snowballs on the top section are separated by red dash ribbon and snowflake paper from DCWV.
The inside matches with a square of navy and the snowflake print. A "Let it snow" sentiment from A.C. Moore's dollar section and a piece of the red ribbon on a diagonal ties it all together.

I've been featured!
The Pilgrim card I made for a Fantabulous Cricut challenge is featured at the following link. Love the challenges on this blog because I love my cticut!
http://fantabulouscricut.blogspot.com/search/label/Scrappin%27%20Saturday
Tuesday, November 13, 2012
Thanksgiving Step Card

I had a fun time creating this little stepper card with my Pilgrim people from the Paper Doll Dressup Cricut Cartridge. Everything was right on the two pages for the Pilgrims including the ship, pie, and turkey. I started with a basket print background which is the same paper I used for the cornicopia inside. I made the serving platter and pie plate out of shiny silver, and the crust and turkey out of a piece of mottled tan which made them look like they were baked golden brown.The ship is cut out twice and glued together for strength as a stiffer cardstock wouldn't cut the railings out nicely. The paper under the ship is a little piece cut from a beach scene. The little leaves are punched with a mini leaf punch from leaf photo paper which made them look sooo real. I hand drew the faces because I hadn't received the face stamps from Peachy Keen yet but I don't think they are too bad. The boy's belt buckle and both of their shoe buckles are gold glitter pen. The sentiment is cut from the George & Basic Shapes cartridge with stitching in black pen. Then I stamped a little "BLESSINGS" on the second step. When you place it on the table, it opens up to see all the layers above one another. This card will go to a needy family with boxes of food for Thanksgiving from myself and my co-workers. This is something we do every year and it is fun to see how much stuff we can put into the boxes before they take them to the recipient. I know they appreciate it because I was once one of those needy families when my kids were very young. I feel it is my turn to reciprocate since I have been blessed with so many good things!

I have entered this in the FANTABULOUS CRICUT CHALLENGE ME MONDAY # 137
PILGRIM'S PROGRESS
http://fantabulouscricut.blogspot.com/2012/11/challenge-me-monday-137-pilrgrims.html
Monday, November 12, 2012
Thanksgiving card & challenges

Happy Thanksgiving Cricut cartridge for corn, swirl, and greeting. EK Success punch for scallops on striped ribbon end. Spellbinders circle and scallop circle dies, bronze glitter penwork.

I am entering this Thanksgiving card in the following challenges:
Paper Playtime #88 - Autumn colors
CardzTV #120 - Attitude of Gratitude
Just a Scrappin' - Stripes/Autumn colors
Mojo Monday - Sketch #267

Mojo Monday - Sketch #267

Wednesday, November 7, 2012
MOJO Monday Challenge Card


This is the card I made for the MOJO Monday challenge 266. I will be giving this to my Granddaughter who will be turning 4 on November 13th.
The card is a top fold with an Action Wobble under the Hello Kitty. This was a good card to use scraps on as the rectangles under the scallop circle are only 2 x 3 inches, one turned the long way and the other turned the short way. The green piece is recycled from the packaging the Hello Kitty stickers were on so it matches the green on the stickers perfectly.

The inside is the same polka dot paper used on the front and I added green polka dot ribbon to the corners to cover a little slip while inking. Sometimes the fixes work for the good.

Sunday, October 21, 2012
Shadow Boxes
I recently went to a craft show to help my friend with her fudge business and thought I might as well make something to sell too! I didn't have any cards ready so I decided to make these shadow boxes. I purchased a 3 pack of white and black frames from Michaels and used my computer for the prayers, my CRICUT, a few stickers, buttons, glitter glue, brads, and pen work to decorate each. The only one I don't have a picture of is the Soldier's Prayer. It is on my manual camera for some reason. I will have to post it when I get the film back.
Guess what? I sold them all!


Guess what? I sold them all!

The teddy bear, ball, and ducky are CRICUT cuts. The onsie and pacifier are stickers. You can see the yellow glitter glue on this picture really well. I also put some pink glitter glue on the heart.

Can you believe I don't have any motorcycle cuts on my CRICUT! These are JOLEE stickers and metal brads. The prayer is printed on a sheet of paper with a road on it.

I have gotten several requests to make more of this one. These are cuts from CUDDLEBUG plates and the seaweed is from the Storybook cartridge.
Sunday, October 7, 2012
CARDS
I received these three fabulous cards from the card swap sponsored by
My Crafting Channel!

The first one was made by Rhonda at www.scraphappenswithrhonda.blogspot.com. She placed an orange print with black swirls on the base card and then colored a witch (or half a witch) with marker and attached her to the front. The inside is blank to write my own message in. THANKS Rhonda! SOOOO CUTE!

The second card was made by Janea at www.recollectionalley.blogspot.com! Purple embossed topped with orange print with penwork stitches back a pair of witches legs and shoes. The witch is in...on green texture cardstock with an orange flower topped with a black button. White polka dot ribbon with a bow decorates the bottom. CUTEY PATOOTIE!


The third card is a group of ghosts wishing me a Happy Haunting made by Pamela (no blog mentioned)! It looks like Pamela hand cut the ghosts and BOO from the center of a rectangle of black cardstock and backed them with white glitter! Harlequin paper and a bow mirrors the orange and black mats behind the cute ghosts.

Inside, a little spider hangs from the greeting! Thanks Pamela, I love the glitter ghosts and just might case this card!

Look for a possible Thanksgiving Card Swap on the My Crafting Channel site! This was my first one ever and I am glad I did it. Not only did it spike my imagination, but it gave me some great ideas for my own cards.
CRAFTS
I thought you might like to see the Wedding Invite shadow boxes I made for an order I got off the benefit shadow box. The roses are hand made by cutting 3 different size teardrops and gluing them to a small tube for the center of the rose. Each teardrop is rolled with a ball tool and rubber mat to make them curl.


The lacy corners on this one were actually part of the invitation. They folded over the top of the gold part. I place them on the third level of the shadow box. The roses are on the second with the invitation on the first level.

Subscribe to:
Posts (Atom)