Hello and thanks for hanging in there with me during my hiatus!
I am back to normal (or as normal as I ever was) and have completed a few projects which I am very happy with.
The first one is one I made for a benefit raffle and am entering on a couple blog challenges. This was just what I needed to jump start my entrance back into paper crafting. I put in the measurements and cartridges used when I wrote that information down but I change my mind often when doing a project so it may be a little lacking in specifics...
So without further ado (what exactly does that mean?) here is my project with lots of pics!
Thanks for looking!


I had this frame from a different project that I had cut out of Lacey Labels (I think) and didn't end up using but I thought it was perfect for this one. I added stitching with a black fine line pen.


I printed a sentiment onto the cardstock with my computer in dark green. Then I wrote over it with a Stardust glitter pen. This makes everything glittery without the flakes coming off. Plus you get good precision with a pen as apposed to Stickles.
I put foam tape on the back of the frame surrounding the opening and placed it over the top of the sentiment.
(You will see what this looks like in the end result)

This is the flower forming kit I put together.
Stencil tips, burnishing tool, and a soft mat from a gum paste flower kit I had from when I did cakes.

I cut several leaf clusters in two different sizes from the Stretch your Imagination Cartridge (pg. 76).
Then I pressed the leaves into the mat to curl and give them some shape instead of laying flat on the paper.
Here I am holding certain areas down with my stencil tool so that it only touches the paper in those areas.
Great tip for making it look full and realistic.


I cut the purple filler flowers from the Celebrations cartridge (Pg. 121) and used the shift/shadow feature to make them without a hole in the middle. I cut 1 set at 1" and 2 sets at 2".
I used a stencil tool to shape the petals and cup the flower.

The blue and white daises were cut from the Nifty Fifties cartridge (page 68) as follows:
(2 at 2"), (2 at 1 1/2"), and (3 at 1").
I then used the shift feature to make (2 at 2") and (2 at 1 1/2") white daisies for the center.


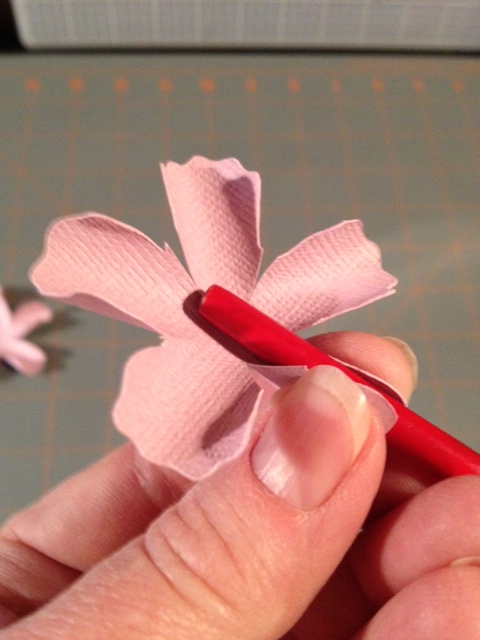
I placed the flower on the mat and using the burnishing tool, I rolled the petals to the center slightly
then flipping the flower over, I used the ball tool to cup the flower which made the petals stand up.


I did the same with the white daisies and glued them to the center of the blue diasies.
I then added a glittered center. I thought that would be too much, but I really liked how these turned out.

Next is the roses! Would you even think you could make roses out of a five petal flower?
I found this on FLOWER BUGS INK SPOT punch art blog. She used a six petal but I chose to cut them from the Artiste cartridge (pg 54) at 2" using the shift/accent 3 feature. Cut down between the petals to separate but not all the way. Keep the petals intact. I curled the petals using the end of a small paint brush (I knew I kept that for a reason). This helps when forming the buds.


Fold the petals into a cup to make the bud. I used Elmer's glue and held it until it stuck. You can also use hot glue but I don't like the stringy things that are left behind. Then I stuck two flowers together, alternating the petals for fullness, then added the bud to the middle.


Here I am burnishing the petals to make them more pliable.
I used Coordinations cardstock which I thought was too stuff and I really had to work it to make them curl but the end result was B-E-A- utiful! The bud becomes fuller as you add more flowers. After making the first one, I didn't like my center so I did it again and I liked this one much better.

I then grouped the flowers together with the leaves onto the mat and added a lady bug on this corner...

and this corner with another grouping of a small rose and a daisy bud.

This is the finished project outside of the shadow box frame. Here you can see the dimension from the foam tape around the opening of the frame. I tried taking pics of it in the frame but the light kept flashing back and made it difficult to see how beautiful it is and the dimensions.
I had made something similar for another benefit raffle last year (you can see it posted also) and have had several requests to make them.
I will be entering this into the FANTABULOUS Cricut Challenge # 158 Paper Roses.
Below is the post of the other Shadow box project I did last year.
I think this is my favorite thing to do with my CRICUT!
Thanks for looking!
Reesey
Lovely card. I love all the flower details. Thanks for sharing your creative process. Thanks for joining our flower challenge at FCCB. Kim Ogden
ReplyDeleteWow! This looks amazing!! I love all the flowers and all the work you put into them to give them dimension and make them look so realistic. Thanks for sharing your tips on how you did this! I bet this looks fabulous inside the shadow box! Thanks for joining us at FCCB this week!!
ReplyDeleteOh my this your card is lovely! The flowers are beautiful and with such intricate detail! Truly stunning.
ReplyDeleteThanks for joining us at FCCB!
Susie
Congratulations on your top five over at Fantabulous Cricut! I would love to invite you to be a part of our Spotlight Sunday! please email me at apieceoflifespie@gmail.com
ReplyDeleteArin
DT Member
Wow Reesey! These flowers are spectacular!! I am so impressed and love that you added so many pics with the steps. I would love to try and make them one day! Gorgeous!
ReplyDeleteScrappy hugs, Connie FCCB DT
http://conniecancrop.blogspot.com
new follower too!
Thanks for all your lovely comments ladies. Makes my day!
ReplyDelete